Exporting and Importing Data
For importing, there are currently two different tool-sets available in CATMAID. A front-end in Django’s admin interface is only available for importing project and stack information. If you want to import tracing data, you have to resort to the command line.
Exporting and importing neuron tracing data
Two management commands for Django’s manage.py tool are available in CATMAID
that allow exporting and importing neuron tracing data. They are called
catmaid_export_data and catmaid_import_data. To use them, you have to be
in the virtualenv and it is probably easiest to work from the
django/projects/ directory.
Exporting data
At the moment, the export command is able to create a JSON representation of
neurons, connectors, tags and annotations. To constrain the exported neurons,
annotations can be used. To export data, you have to use the
catmaid_export_data command:
manage.py catmaid_export_data
Adding the --help option will show an overview over all available options.
When called without any option, the command will ask the user for the project to
export from and will start exporting the whole project right away. Use the
additional options to be more precise about what should be exported.
Without any parameter, everything is exported. The type of data to be exported
can be adjusted by the --notreenodes, --noconnectors,
--noannotations and --notags parameters. To constrain the exported
neurons, the --required-annotation option can be used. For instance, to
export all neurons from the project with ID 1 that are annotated with
“Kenyon cells”, one would have to call:
manage.py catmaid_export_data --source 1 --required-annotation "Kenyon cells"
This will create a file called export_pid_<pid>.json, which would be
export_pid_1.json in our case. A different file name can be specified using
the --file option and if the passed in string contains “{}”, the braces will
be replaced by the source project ID.
Users are represented by their usernames and it is not required to export user
model objects as well. The importer can either map to existing users or create
new ones. If wanted, though, complete user models can be exported (and imported)
as well by providing the --users option. Be aware though that this includes
the hashed user passwords.
Importing data
The JSON file generated in the previous section can be used to import data into
a CATMAID project. This project can be non-empty or a new one and can be part of
the source CATMAID instance or a completely different one. do this so, use the
catmaid_import_data management command:
manage.py catmaid_import_data
You can use the --help switch to get an overview of the available options.
Like the exporter, the importer will ask a user if it needs more information. If
no project is specified, users can select an existing one or create a new empty
target project interactively.
Assuming a file called export_pid_1.json is available and a new CATMAID
project with ID 1 has been created, the following command will start the
import:
manage.py catmaid_import_data --source export_pid_1.json --target 1
By default, the importer tries to map users referenced in the input data to
existing users. If this is not wanted, the option --map-users false has to
be used.
The importer looks at the user_id, editor_id and reviewer_id
fields of imported objects, if available. CATMAID needs to know what to do with
this information. Besides mapping users, CATMAID can also override all import
data user information with a single user. Setting --map-users false and
either selecting a user interactively oder with the help of the --user <id>
option, will accomplish this.
If users are mapped and a username does not exist, the import is
aborted—unless the --create-unknown-users option is provided. This will
create new inactive user accounts with the provided usernames that are
referenced from the new imported objects. The allows to not require full user
profiles to be part of exported data.
By default, the importer won’t use the IDs of spatial data provided from the
import source and instead will create new database entries. This default is
generally useful and doesn’t risk replacing existing data. All relations between
objects are kept. If however needed, the use of the source provided IDs can be
enforced by using the --preserve-ids option.
Semantic data, like annotations and tags however are re-used if already available in the target project. The only exception to this are neuron and skeleton objects, which are technically semantic objects, but are expected to not be shared or reused.
Bulk loading large data sets
Importing data using the catmaid_import_data management command works well
for thousands of neurons and connectors. It becomes however very slow and memory
intensive to load millions or billions of neurons. On this scale, loading data
direcrly into the database is the best strategy. It requires extra care, because
most safe-guards the API and management commands provides will be bypassed.
Details on the import process are collected on the Bulk loading page.
Importing project and stack information
Image data in CATMAID is referenced by stack mirrors, which belong to a particular stack. Stacks in turn are organized in projects. The data used by a stack mirror can have one of various types of data sources. A simple and often used source is a simple folder structure of tiled image data for each stack. To be accessible, a stack mirror’s image base has to give access to such a folder from the web. Of course, stacks, stack mirrors and projects can be created by hand, but there is also an importing tool available in Django’s admin interface. It can be found under Custom Views and is named Import projects and image stacks.
The admin import tool can import project and stack information from various source:
Other CATMAID instances,
A general remote API endpoint
A remote or local JSON file
A textural JSON definition
A local file and folder structure
All JSON representaitons that can be imported are of the format that is returned
by CATMAID’s /projects/export API endpoint. This very same format can be
used with a managment command, catmaid_import_projects, on the command line.
The command line option and the file based import are explained in more detail below. The latter expects a certain data folder layout to work on and als relies on so called project files (a file in a simple YAML format) to identify potential projects. Its data layout is explained below as well.
How to use the importing tool will be shown in the last section.
Note
Regardless of whether you import image stacks with the help of the importer or
add projects, stacks, stack mirrors, project-stack links and permissions by
hand: you need to make the image data accessible through your webserver. For
instance, say you are running CATMAID on the URL example.com/catmaid and
you are using the importer and have IMPORTER_DEFAULT_IMAGE_BASE set to
https://example.com/catmaid/data and CATMAID_IMPORT_PATH to
/home/catmaid/data/. The webserver would now need to map /catmaid/data
to /home/catmaid/data/. For Nginx this would look like that:
location /catmaid/data/ {
  alias /home/catmaid/data/;
}
Importing projects and stacks on the command line
The management command catmaid_import_projects can be used to import project
from the command line. It understands the basic /projects/export API
endpoint format. A simple example might look like this:
[{
  "project": {
    "title": "L1 CNS",
    "stacks": [{
      "title": "L1 CNS",
      "dimension": "(28128, 31840, 4841)",
      "mirrors": [{
        "fileextension": "jpg",
        "position": 3,
        "tile_source_type": 4,
        "tile_height": 512,
        "tile_width": 512,
        "title": "Example tiles",
        "url": "https://example.com/ssd-tiles/"
      }],
      "resolution": "(3.8,3.8,50)",
      "translation": "(0,0,6050)"
    }]
  }
}]
This can be provided as a file with its path provided as --input argument to
catmaid_import_projects or through the stdin stream that is piped into
it. Additionally, it possible to provide permissions for the imported projects.
This is done through one ore more --permission parameters. Each of them will
take an argument in the form type:name:permission, where type can either
be user or group. name is either a username or a groupname and
permission can be can_browse, can_annotate and so forth.
The import can be configured with additional options which are explained when
using the --help option.
Project Files
If the importing tool encounters a folder with a file called project.yaml in
it, it will look at it as a potential project. If this file is not available,
the folder is ignored. However, if the file is there it gets parsed and if all
information is found the tool is looking for, the project can be imported. So
let’s assume we have a project with two stacks having one image data copy each
in folder with the following layout:
project1/
  project.yaml
  stack1/
  stack2/
A project file contains the basic properties of a project and its associated stacks. It is a simple YAML file and could look like this for the example above:
project:
    title: "Wing Disc 1"
    stacks:
      - title: "Channel 1"
        description: "PMT Offset: 10, Laser Power: 0.5, PMT Voltage: 550"
        dimension: "(3886,3893,55)"
        resolution: "(138.0,138.0,1.0)"
        mirrors:
          - title: "Channel 2 overlay"
            folder: "stack1"
            fileextension: "jpg"
      - title: "Channel 2"
        description: "PMT Offset: 10, Laser Power: 0.7, PMT Voltage: 500"
        dimension: "(3886,3893,55)"
        resolution: "(138.0,138.0,1.0)"
        downsample_factors: ["(1,1,1)", "(2,2,1)", "(4,4,1)"]
        mirrors:
          - title: Channel 2 image data
            folder: "stack2"
            fileextension: "jpg"
        stackgroups:
          - title: "Example group"
            relation: "has_channel"
      - title: "Remote stack"
        dimension: "(3886,3893,55)"
        resolution: "(138.0,138.0,1.0)"
        zoomlevels: 3
        downsample_factors: ["(1,1,1)", "(2,2,1)", "(4,4,1)", "(8,8,1)", "(16,16,1)"]
        translation: "(10.0, 20.0, 30.0)"
        mirrors:
          - tile_width: 512
            tile_height: 512
            tile_source_type: 2
            fileextension: "png"
            url: "https://my.other.server.net/examplestack/"
        stackgroups:
          - title: "Example group"
            relation: "has_channel"
As can be seen, a project has only two properties: a name and a set of stacks. A
stack, however, needs more information. In general, there are two ways to
specify the data source for a folder: 1. an optional path and a folder,
both together are expected to be relative to the IMPORTER_DEFAULT_IMAGE_BASE
settings or 2. a url, which is used as a stack mirror’s image base.
The first stack in the example above is based on a folder in the same
directory as the project file. The folder property names this image
data folder for this stack, relative to the project file. The name of
stack is stored in the title field and metadata (which is shown when
a stack is displayed) can be added with the metadata property. A
stack also needs dimensions and resolution information.
Dimensions are the stacks X, Y and Z extent in pixel. The resolution
should be in in nanometers per pixel, in X, Y and Z.
In addition to the folder information, the second and third stack above use
the downsample_factors field to declare the number of available “zoom
levels”. This is done by providing a list of 3D scale factors, one for each
zoom level available, with 1,1,1 being the unscaled voxel size of the data
set. In a classical anisotropic TEM data set, it is common to zoom out in steps
of factors of two in X and Y and keep the visual section thickness the same.
Assuming there are four additional zoom levels besides the original version, this
could be expressed as the downsample factors ["(1,1,1)", "(2,2,1)", "(4,4,1)",
"(8,8,1)", "(16,16,1)"], scaling X and Y by a factor of two and Z not at all
for each entry of the array.
Of course, any other configuration could be chosen as well. Likewise for
isotropic data sets like FIB-SEM, the Z component in each tuple would be
scaled as well. If no downsample_factors are given, CATMAID’s default behavior
is to use as many scale levels as are needed in the above anisotropic downsample
factors for the original image width or height to fit on a single tile. Since
different stack mirrors can have different tile sizes, the minimum of those are
used. Without any mirrors, no zoom levels will be assumed.
The example above also specifies the file extension of the image files with the
fileextension key. Both fields are required.
The last stack in the example above doesn’t use a local stack folder, but
declares the stack mirror’s image base explicitly by using the url setting.
Like done for the folder based stacks, a url based stack mirror needs the
tile_width, tile_height and tile_source_type fields. The
corresponding stack defines the resolution and dimension fields.
CATMAID can link stacks to so called stack groups. These are general data
structures that relate stacks to each other, for instance to denote that they
represent channels of the same data, orthogonal views or simple overlays. There
is no limit on how many stack groups a stack can be part of. Each stack in a
project file can reference stack groups by title and the type of relation
this stack has to this stack group. At the moment, valid relations are
channel and view. All stacks referencing a stack group with the
same name will be linked to the same new stack group in the new project. In the
example above, a single stack group named “Example group” will be created,
having stack 2 and 3 as members—each representing a layer/channel. Stack
groups are used by the front-end to open multiple stacks at once in a more
intelligent fashion (e.g. open multi-channel stack groups as layers in the same
viewer).
All specified stacks within a project are linked into a single space. By default
each stack origin is mapped to the project space origin (0,0,0). An optional
translation can be applied to this mapping: If a stack has a translation
field, the stack is mapped with this offset into project space. Note that this
translation is in project space coordinates (physical space, nanometers). The
example above will link the last stack (“Remote stack”) to the project “Wing
Disc 1” with an offset of (10.0, 20.0, 30.0) nanometers. Both other stacks
will be mapped to the project space origin.
Also, it wouldn’t confuse the tool if there is more YAML data in the project file than needed. It only uses what is depicted in the sample above. But please keep in mind to not use the tab character in the whitespace indentation (but simple spaces) as this isn’t allowed in YAML.
Ontology and classification import
The project files explained in the last section can also be used to import ontologies and classifications. While CATMAID supports arbitrary graphs to represent ontologies and classifications,only tree structures can be imported at the moment.
The project object supports an optional ontology field, which defines an
ontology hierarchy with lists of lists. An optional classification field can
be used to define a list of ontology paths that get instantiated based on the
provided ontology. Classification fields require that an ontology is defined and
can be used on project level, stack level and the stackgroup level.
Consider this example:
project:
   title: "test"
   ontology:
     - class: 'Metazoa'
       children:
         - relation: 'has_a'
           class: 'Deuterostomia'
         - relation: 'has_a'
           class: 'Protostomia'
           children:
             - relation: 'has_a'
               class: 'Lophotrochozoa'
               children:
                 - relation: 'has_a'
                   class: 'Nematostella'
                   children:
                     - relation: 'has_a'
                       class: 'Lineus longissimus'
   stackgroups:
     - title: 'Test group'
       classification:
          - ['Metazoa', 'Protostomia', 'Lophotrochozoa', 'Nematostella', 'Lineus longissimus']
   stacks:
     - title: "Channel 1"
       description: "PMT Offset: 10, Laser Power: 0.5, PMT Voltage: 550"
       dimension: "(1024,1024,800)"
       resolution: "(2.0,2.0,1.0)"
       zoomlevels: 1
       translation: "(10.0, 20.0, 30.0)"
       classification:
          - ['Metazoa', 'Deuterostomia']
       mirrors:
          - title:  Channel 1
            url: "https://example.org/data/imagestack/"
            fileextension: "jpg"
     - title: "Channel 1"
       description: "PMT Offset: 10, Laser Power: 0.5, PMT Voltage: 550"
       dimension: "(1024,1024,800)"
       resolution: "(2.0,2.0,1.0)"
       zoomlevels: 1
       translation: "(10.0, 20.0, 30.0)"
       mirrors:
         - title: Channel 1
           url: "https://example.org/data/imagestack-sample-108/"
           fileextension: "jpg"
       stackgroups:
        - title: "Test group"
          relation: "has_channel"
     - title: "Channel 2"
       description: "PMT Offset: 10, Laser Power: 0.5, PMT Voltage: 550"
       dimension: "(1024,1024,800)"
       resolution: "(2.0,2.0,1.0)"
       zoomlevels: 1
       mirrors:
        - title: Channel 2
          folder: "Sample108_FIB_catmaid copy"
          fileextension: "jpg"
       stackgroups:
        - title: "Test group"
          relation: "has_channel"
The project level ontology definition represent an ontology with the root node “Metazoa” which has two children: “Deuterostomia” and “Protostomia”, connected through a “has_a” relation. While the first child is a leaf node and has no children, the second child has a child node as well (and so on). It is possible to have multiple roots (i.e. separate ontology graphs) and multiple children, both are lists.
Individual stacks and stackgroups are then allowed to instantiate a certain path
of the ontology and be linked to the leaf node of the path. They do this by
supporting a classification field. The example creates two classification
paths and links one leaf node to the stack group and one to an individual stack.
Currently, the importer expects that those two classes are only related on the ontology level a single time. This allows for an easier file syntax with a simple list. An import will fail if the project defined ontology doesn’t contain a class used in a classification.
File and Folder Layout
The importing tool expects a certain file any folder layout to work with. It assumes that there is one data folder per CATMAID instance that is accessible from the outside world and is somehow referred to within a stack mirror’s image base (if referring to folders in the project file). As an example, let’s say a link named data has been placed in CATMAID’s top-level directory. This link links to your actual data storage and has a layout like the following:
data/
  project1/
  project2/
  project3/
  tests/
    project4/
Each project folder has contents similar to the example in the previous section. Assuming your webserver has been configured to make this folder accessible, it should be possible to have the browser access it under:
https://<CATMAID-URL>/data
A typical URL to a tile of a stack could then look like this (if you
use jpeg as the file extension):
https://<CATMAID-URL>/data/project1/stack1/0/0_0_0.jpeg
The importer uses this data directory or a folder below it as working
directory. In this folder it treats every sub-directory as a potential
project directory and tests if it contains a project file named
project.yaml. If this file is found a folder remains potential
project. A folder is ignored, though, when the project file is not
available.
Also note, that such a data folder needs to be made accessible by the webserver. Otherwise, the CATMAID front-end won’t be able to retrieve and show image data. The “Note” box at the beginning of this section has more details on this.
Importing skeletons through the API
The CATMAID API supports raw skeleton data import using SWC files. As can be
seen under /apis, the {project_id}/skeletons/import URL can be used to
import skeletons that are repesented as SWC. The script
scripts/remote/upload_swc.py can be of help here. It is also possible to
just use cURL for this:
curl --basic -u fly -X POST --form file=@<file-name> \
    <catmaid_url>/<project_id>/skeletons/import \
    --header "X-Authorization: Token <api-token>"
Using the importer admin tool
The import offers to import from local project files, remote CATMAID instances or remote project files/exports.
To use the importer with project files, you have to adjust your CATMAID settings
file to make your data path known to CATMAID. This can be done with the
CATMAID_IMPORT_PATH settings. Sticking to the examples from before, this
setting might be:
CATMAID_IMPORT_PATH = <CATMAID-PATH>/data
For imported stack mirrors that don’t provide an image URL by themselves,
CATMAID can construct an image base from the the IMPORTER_DEFAULT_IMAGE_BASE
setting plus the imported project and stack names. For the example above, this
variable could be set to:
IMPORTER_DEFAULT_IMAGE_BASE = https://<CATMAID-URL>/data
With this in place, the importer can be used through Django’s admin interface. It is listed as Image data importer under Custom Views. The first step is to give the importer more detail about which folders to look in for potential projects:
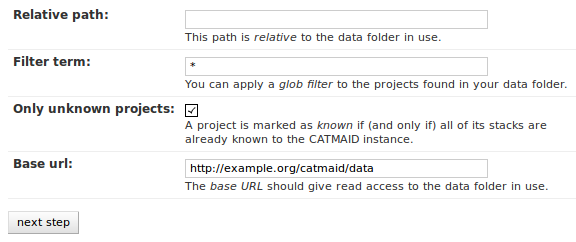
With these settings, you can narrow down the set of folders looked at. The
relative path setting can be used to specify a sub-directory below the import
path. When doing so, the working directory will be changed to
CATMAID_IMPORT_PATH plus the relative path. If left empty, just the
CATMAID_IMPORT_PATH setting will be used. Additionally, you can filter
folders in tho working directory by specifying a filter term, which supports
Unix shell-style wildcards. The next setting lets you decide how to deal with
already existing (known) projects and what is considered known in the first
place. A project is known can be declared to be known if the name of an
imported project matches the name of an already existing one. Or, it can be
considered known if if there is a project that is linked to the very same
stacks like the project to be imported. A stack in turn is known if there is
already a stack with the same mirror image base. The last setting on this dialog
is the Base URL. By default it is set to the value of
IMPORTER_DEFAULT_IMAGE_BASE (if available). This setting plus the relative
path stay the same for every project to be imported in this run. It is used if
imported stacks don’t provide a URL explicitly. To continue, click on the next
step button.
The importer will tell you if it doesn’t find any projects based on the settings of the first step. However, if it does find potential projects, it allows you to unselect projects that shouldn’t get imported and to add more details:
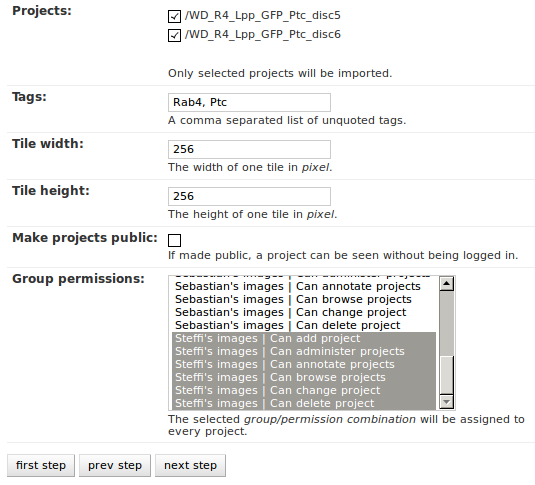
Besides deciding which projects to actually import, you can also add tags which will be attached to the new projects. If the tile size differs from the standard, it can be adjusted here. If you want your projects to be accessible publicly, you can mark the corresponding check-box.
When the Check classification links option is selected, the importer tries to suggest existing classification graphs to be linked to the new project(s). These suggestions are optional and based on the tags you entered before. If existing projects have the same tags or a super set of it, their linked classification graphs will be suggested.
The last adjustment to make are permissions. With the help of a list box you can select one or more group/permission combinations that the new projects will be assigned. If all is how you want it, you can proceed to the next dialog.
The third and last step is a confirmation where all the information is shown the importer found about the projects and stacks to be imported. To change things in this import, simply go back to a step before, using the buttons at the bottom of the page. If all the project and stack properties as well as the tags and permissions are correct, the actual import can start.
In the end the importer will tell you which projects have been imported and, if there were problems, which ones not.
